维护服务器时虽然上传/下载单个文件的需求不是特别频繁,但偶尔总会有,这时候再打开其他工具登录再目录定位再上传/下载,一波操作下来虽然不是特别耗时但很繁琐。iTerm2 的 Shell Integration 可以让以上操作直接在 iTerm2 上完成,简单、快速、优雅。
安装 Shell Integration
Shell Integration 需要在服务器和本机都安装了才能正常使用。
自动安装
执行以下命令即可:
curl -L https://iterm2.com/shell_integration/install_shell_integration.sh | bash
新版的 iTerm2 已经内置了 Shell Integration 的安装入口,依次点击 “iTerm2” > “Install Shell Integration” 即可。有两种安装方式:
- Download and Run Intaller,其实就是执行上面的自动安装命令;
- Internet-Free Install,如果服务器没有连接外网的权限,可以用这种方式;
手动安装
第一步:执行以下命令下载脚本;
curl -L https://iterm2.com/shell_integration/bash \
-o ~/.iterm2_shell_integration.bash
第二步:把以下命令添加到你的 ~/.bash_profile 或者 ~/.profile 文件中;
source ~/.iterm2_shell_integration.bash
配置 iterm2_hostname 环境变量
一般服务器的 hostname 是 localhost 或者随机生成的字符串,Shell Integration 会用来连接服务器,但往往 hostname 我们只是用来作为标识或者另有用途,并不具备作为 IP 或者域名让 Shell Integration 去连接,我们可以通过在服务器单独配置 iterm2_hostname 环境变量来解决。通过执行以下命令来配置:
export iterm2_hostname=远程服务器的 IP(例如:39.100.157.174:26849) 或者别名(例如:vps.aliyun)
作者设置的 iterm2_hostname 环境变量值为 vps.aliyun 而不是 IP 地址,那是因为作者在 ~/.ssh/config 中为服务器设置了别名。关于 vps.aliyun 的配置如下:
Host vps.aliyun
  HostName 114.115.116.117
  Port 26849
  User wardchan
  IdentityFile ~/Dropbox/config-files/identity/id_rsa_vps_has_pass
操作方式
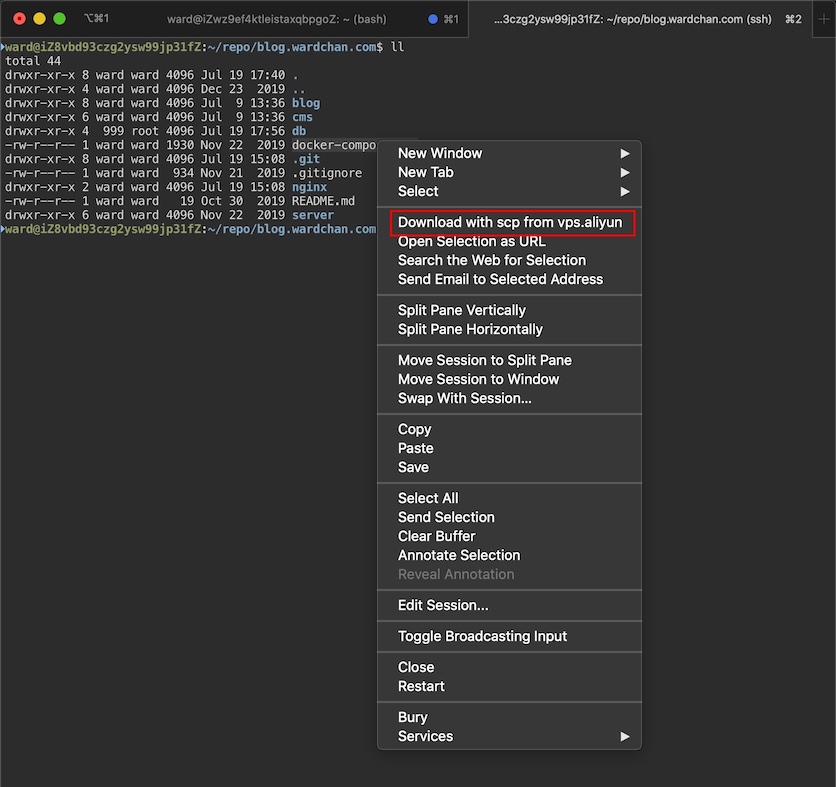
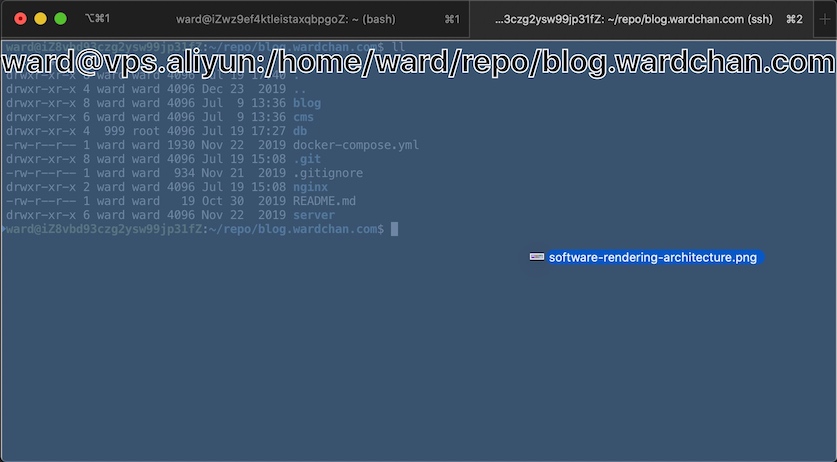
从服务器下载文件
选中文件名,在右键弹出的菜单中选 “Download with scp from 你的远程服务器 IP 或别名” 即可。
注意:如果 “Download with scp” 的选项是灰色的,说明 iterm2_hostname 配置不正确。
上传文件到服务器
按住 “option” 键,选中文件并拖拽到 iTerm2 窗口即可上传。
参考
本文链接:https://blog.wardchan.com/posts/iterm2-enable-shell-integration-to-support-file-upload-and-download.html,参与评论 »
--EOF--
发表于 2020-07-19 10:22:33,并被添加「iTerm2,工具」标签,最后修改于 2020-10-17 10:18:39。查看本文 Markdown 版本 »
Comments